> For the complete documentation index, see [llms.txt](https://docs.maplytics.com/llms.txt). Markdown versions of documentation pages are available by appending `.md` to page URLs; this page is available as [Markdown](https://docs.maplytics.com/maplytics/azure-maps-google-maps-mapbox/features/plot-records-on-map/tooltip-card/quick-call-to-action-buttons.md).
# Quick Call to Action Buttons
The user can associate quick action buttons. This helps in saving time while switching between screens to take actions. The first few actions are the default actions and cannot be changed by the user. The user can further add actions for creating records for activities and related entities. The default actions are as follows:
· Open Record: Open record directly from this screen to edit any field
· Directions: The record can be set as origin, destination, or just a waypoint
· Change Owner: Assign an owner to the respective record by selecting a user or a team
· Set As Current Location: This pushpin can become the current location for operations.
· Set As POI Location: Can assign it as the point of interest
· Plot Related Record: Plot One-to-Many and Many-to-One Relationships/Related records of a particular record, as shown below:
Select the required relationships from the list and click on the ‘Plot Records’ button. Related records will be plotted as shown below. Related Records can be plotted for multiple records simultaneously.
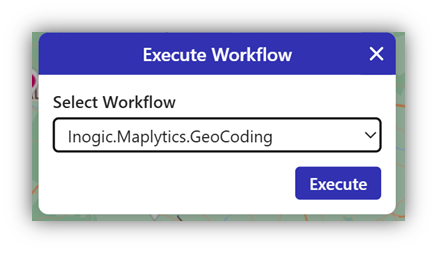
* **Execute Workflow:** The user can execute on-demand workflows on an individual record. When this button is clicked, it will open a window which will list down all the on-demand workflows available for the respective Entity as shown below:
The user can customize the rest of the actions according to their requirement. For example, a user can add Email, Add Task, Appointment, Quote, and many more.
The user can define these actions under ‘Advanced Settings’ in Entity Maps.
***Go to*** ***Settings> Entity Map > Select Required Record > Advanced Settings > Tooltip Card Actions**,* or refer to the ‘Setup Entity Map’ section of the Installation Manual for further instructions.
· Email: Send email to this record
· Add Task: Add task to this particular record
· Appointment: Schedule an appointment with this record
· Letter: Log physical letters sent to this record
· Phone Call: Get on a call with the records
· Work Order: Create a Work Order related to the plotted entity record
· Follow and Unfollow: When the pushpin is clicked, the respective Tooltip card opens, which has actions on it. The follow/unfollow action is visible among them.
This action enables the Admin and all the users to follow the record.
In this way, the activities performed on the record by the users get listed within the timeline. The emails sent, contacts updated, and more can be easily viewed and tracked. With these updates, the admin or the users can understand the activities performed on the record by any of the users or the admin himself.
The same button switches to unfollow if the record is already being followed. With ‘unfollow’, the activities will not be visible on the timeline. This means User A will not be able to check if an Email invite has been shared with the record by User B, and so on.
The principle of follow/unfollow in Maplytics is similar to the one within Dynamics 365 CRM.
The user can define this action under ‘Advance Settings’ in Entity Maps. ***Go to Setting > Entity Map Advance Settings > Tooltip Card Actions*** or refer to the ‘Setup Entity Map’ section of the Installation Manual for further instructions.
**Hover**
The user can hover over Dynamics CRM Records plotted on the map to have a quick glance at their details. The user can have a maximum of 6 different attributes here, apart from the title attribute. Refer to the ‘Setup Entity Map’ section of the Installation Manual for steps to configure attributes on hover.
{% hint style="success" %}
For any queries, reach out to us at
{% endhint %}